We recently introduced the sensu-plugins-sdk and the new template plugin projects. In this post — based on our recent webinar — I’m going to dive deeper into those community resources and illustrate how to publish an asset using the Sensu Go SDK. I’ll also cover how to package compiled binary plugins (including dynamically linked libraries) as assets.
Before I get into the SDK, we realize terminology around Sensu plugins and assets can get a little confusing. Here’s a good way to think about it: plugins are a general term that encompasses all the different ways you can extend and adapt the Sensu monitoring pipeline to fit your needs. Sensu plugin projects are typically organized around a specific service or goal. Assets are a new packaging concept for plugins. Assets make it possible to install new functionality into your Sensu monitoring environment in a just-in-time fashion.
Publishing assets with the Sensu Go SDK
First off, some definitions. From the project’s README, the Sensu Go SDK is “a framework for building Sensu Go plugins. Plugins can be Checks, Handlers, or Mutators. With this library the user only needs to define the plugin arguments, an input validation function and an execution function.”
To make use of the Sensu Go SDK, you’ll use one of our community templates. To get you started, we’ve created repositories of plugin templates by resource type:
These templates include templated started Go source code, README, CHANGELOG, LICENSE, and .gitignore files. They also include the necessary files to build and release your assets with goreleaser and GitHub actions, as well as publish to Bonsai, the Sensu asset index.
To get started with templates, you’ll use the Sensu plugin tool, a command-line tool that generates the actual directory structure you need based on the templates you’re using. Essentially, the Sensu plugin tool generates the scaffolding for a new Sensu plugin project — it does the work of cloning the appropriate template repo and substituting in your info based on what kind of plugin you’re creating. You can download a binary for your platform from the releases tab in the repo.
Demo: Build and publish a Sensu Go check written in golang
For the purposes of this demo, I’ve already downloaded the Sensu plugin tool. I run it and create a new check. It asks me where to get the template from, so we accept the default. We’ll do that for the description, too.
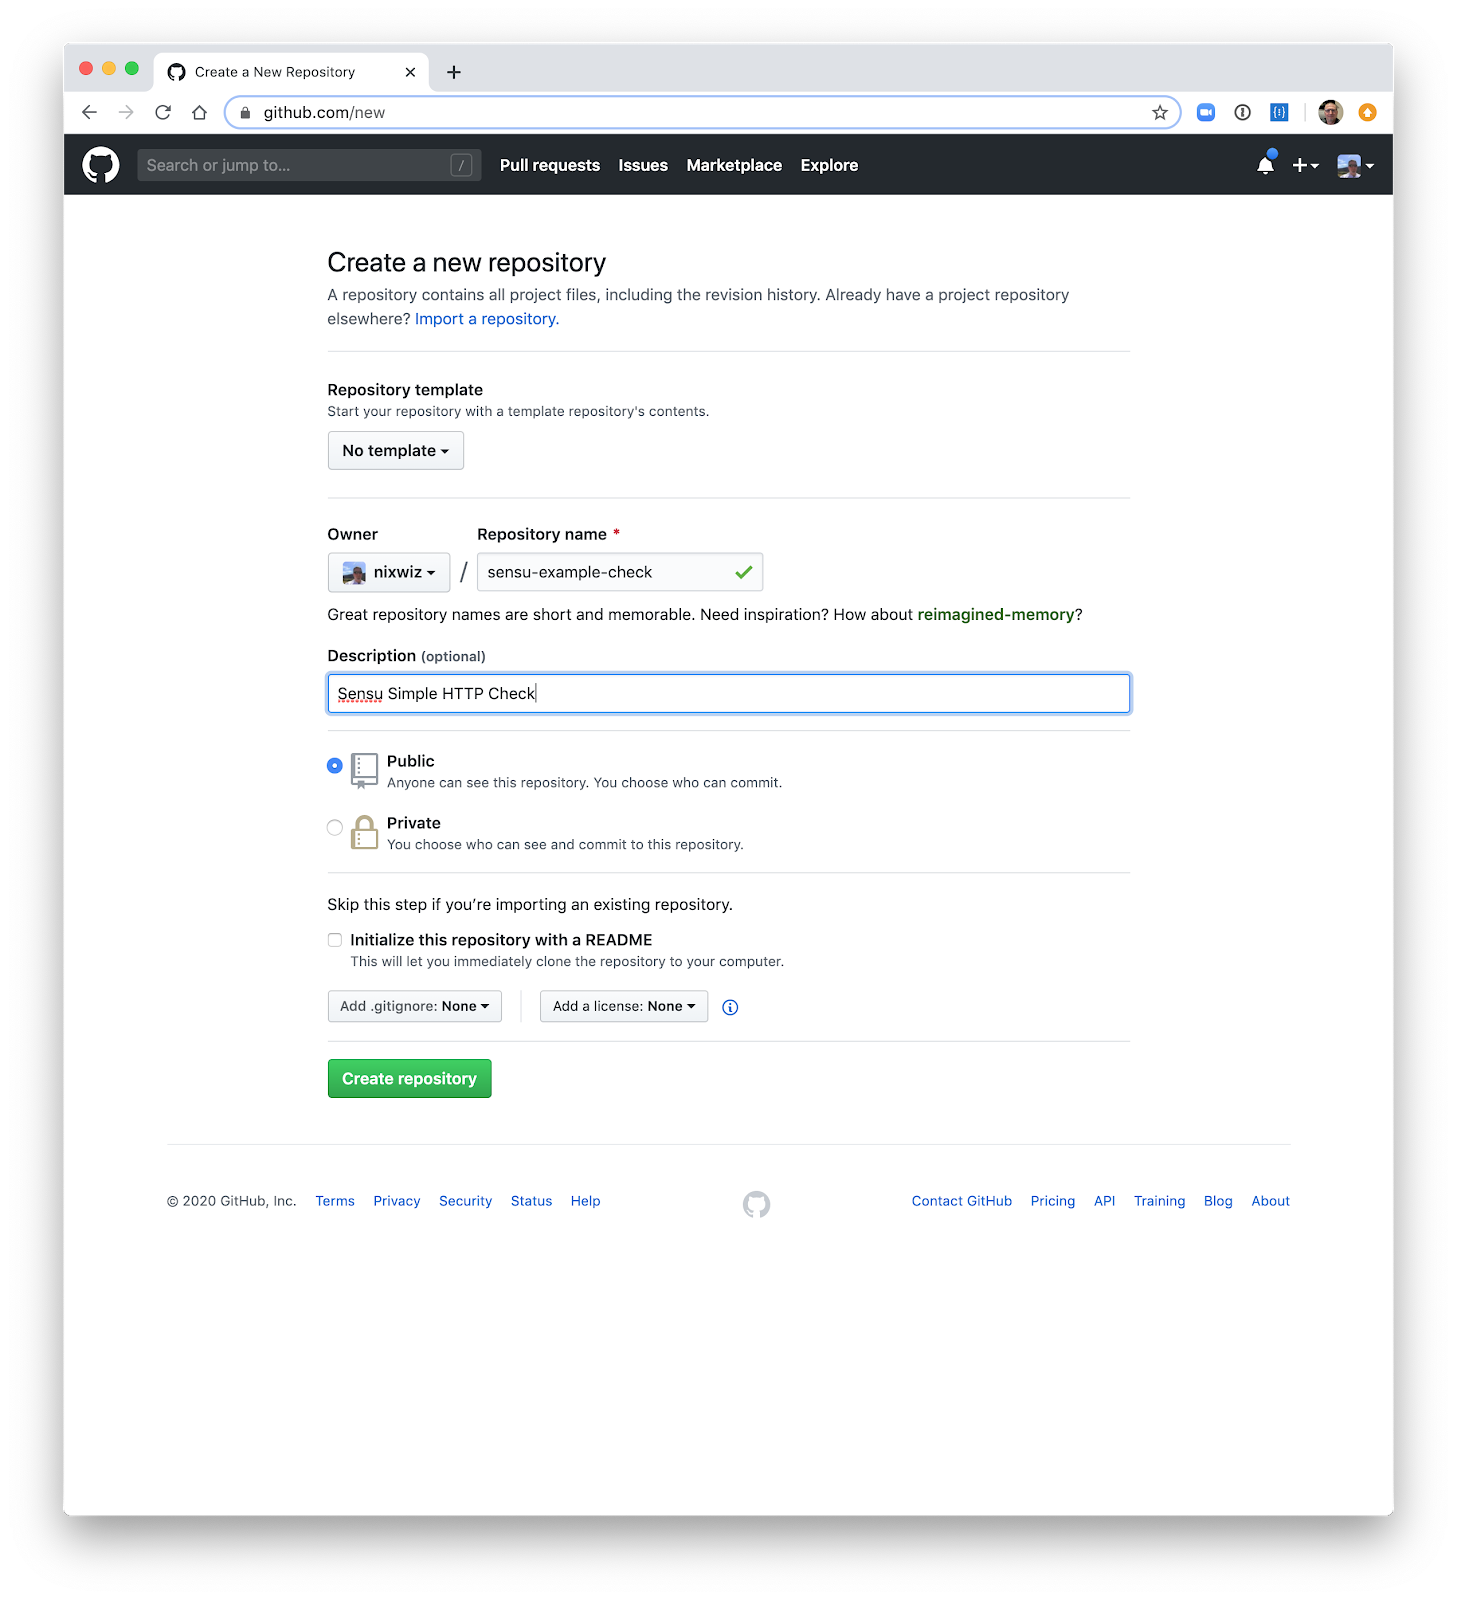
In this example, I’ve named our project sensu-example-check. This creates a directory structure under that GitHub project name, but it doesn’t create the actual repository in GitHub just yet (we’ll get to that in a moment).
Using atom I browse this newly created directory. You’ll see the directory structure it creates, including the GitHub directory which defines the GitHub actions. There’s also a Bonsai yaml file and gitignore configurations for goreleaser, right out of the box.
For most plugins, there are only four files that will require updating. The CHANGELOG.md file is where you will track your changes. The README.md file will need to be updated to reflect the proper usage of your plugin. The README included from the template has information on template use at the top, that will need to be deleted as well. The remaining two files are the actual golang source and test files, main.go and main_test.go, respectively.
The main.go source file contains what will be the actual check code. The code provided in the template main.go file shows a working example. The main sections that will need to be changed for us to write our own check are the definition of our options, the input validation function (checkArgs), and the check execution function (executeCheck). If you compare the code from the template main.go to my example main.go, you will see a good representation of the necessary updates.
This particular check takes two arguments: the URL to check, which defaults to http://localhost:80, and the search string to look for in the HTML returned from that URL. I also include some input validation — the plugin URL can’t be a zero-length string and the search string can’t be a zero-length string. Upon execution, the check will connect to that URL, read in the body of the text from that page to search for whatever string provided. If it’s found, it will exit ok, if not, it’ll exit with critical.
We also have unit test code in the main_test.go source file. Again, you can compare the template main_test.go with my example main_test.go. This test simply creates an internal web server that services GET requests for / by returning the text SUCCESS. We test our executeCheck function by looping through a couple of test cases. In one we look for the text SUCCESS and expect it to return OK and in the other we search for the text FAILURE and expect it to return a Critical failure. Here’s the output of running the tests.
After our tests pass, we’ll actually build the binary and test it for real.
For the purposes of this demo, I’ll search the Sensu website for the term Monitoring. No surprise there — our website mentions monitoring a few times, so our check returned an ok.
Now, how about the term Fabulous? Nope, looks like we’re too humble to say we’re fabulous at monitoring, so our check failed to find that term.
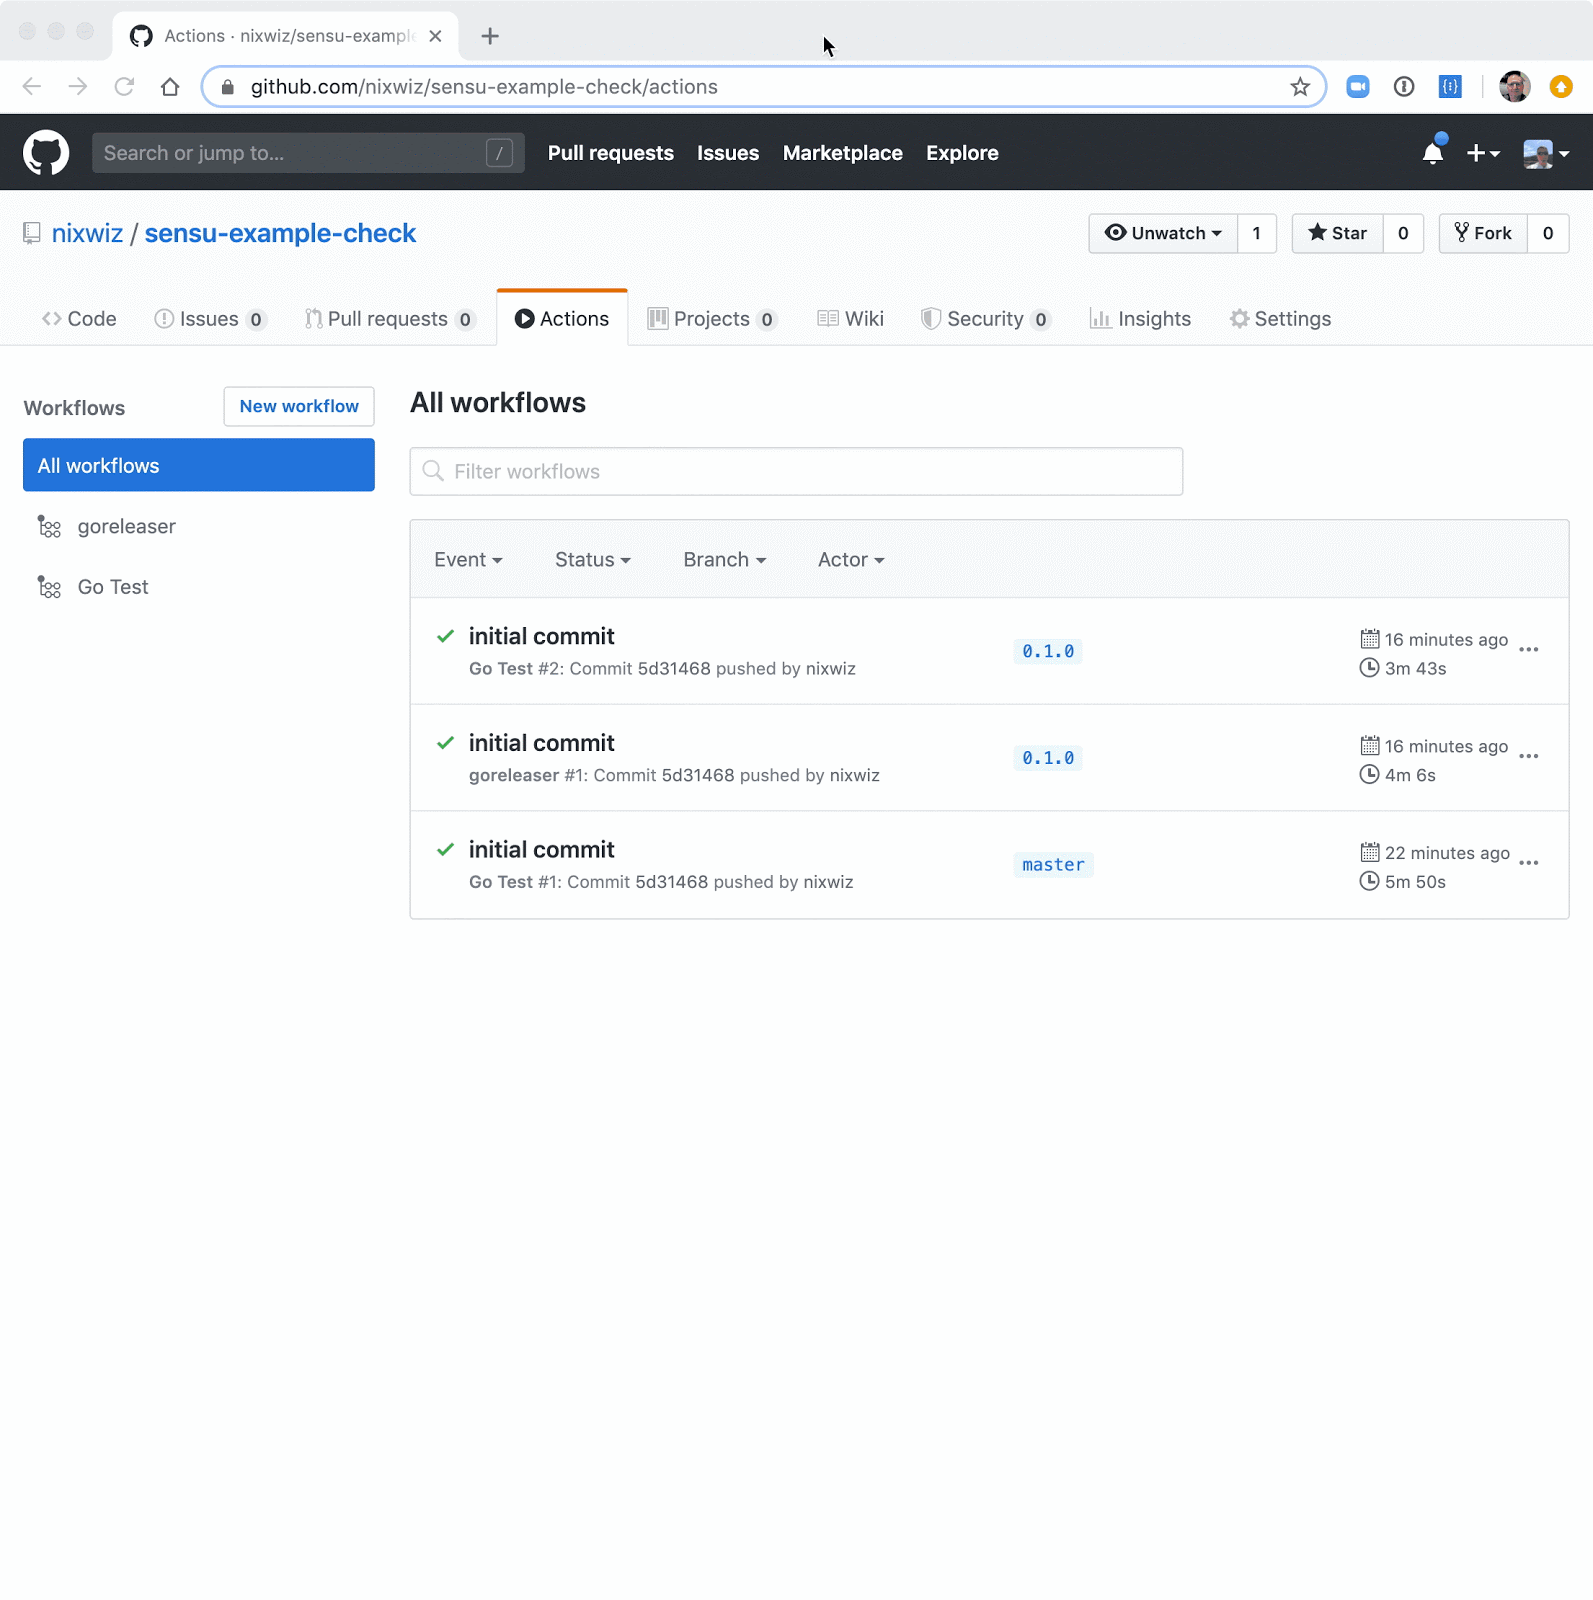
Now that we have a working check, we can get it into GitHub. I’ll create a new repo, using my same project name from earlier. I then follow the provided instructions to initialize and upload the files to GitHub.
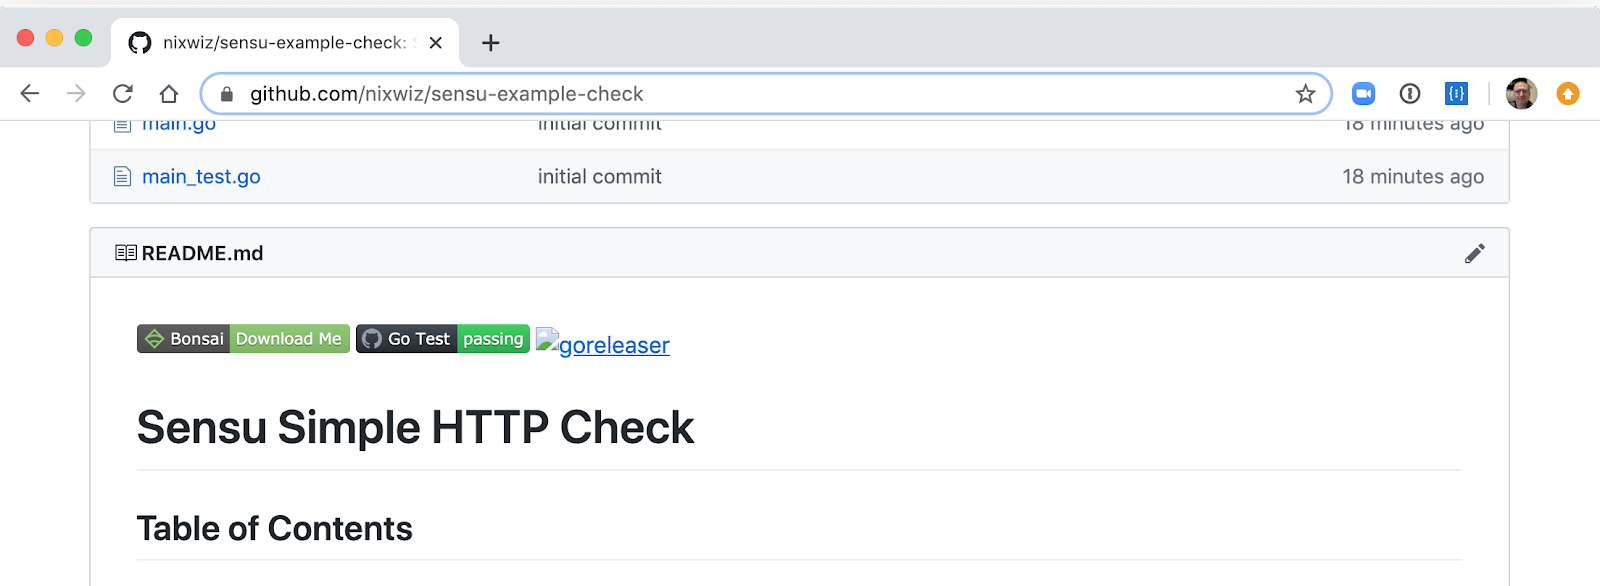
Now that our check is in GitHub, you can see the repo with our README. You may see a broken link or two for the badges at first because not all of the GitHub actions have completed a run yet. Once the “Go Test” action completes following our first commit, you’ll see its badge and the only remaining broken link will be for the “goreleaser” badge.
Finally, to add our check to Bonsai, we’ll tag it as a release so it will create release assets. If you take a look at the .goreleaser file, you’ll see it will be building binaries for several different architectures and operating systems. It’ll also get tarred up for SHA-512, which is what we expect for Bonsai assets.
Now we see that goreleaser is all done — there’s the green checkmark on the actions page, and the goreleaser badge is working. If you head to the releases tab, you’ll see all the release assets we’ve created.
Now, what to do with them? We’ll head to Bonsai and add it as an asset:
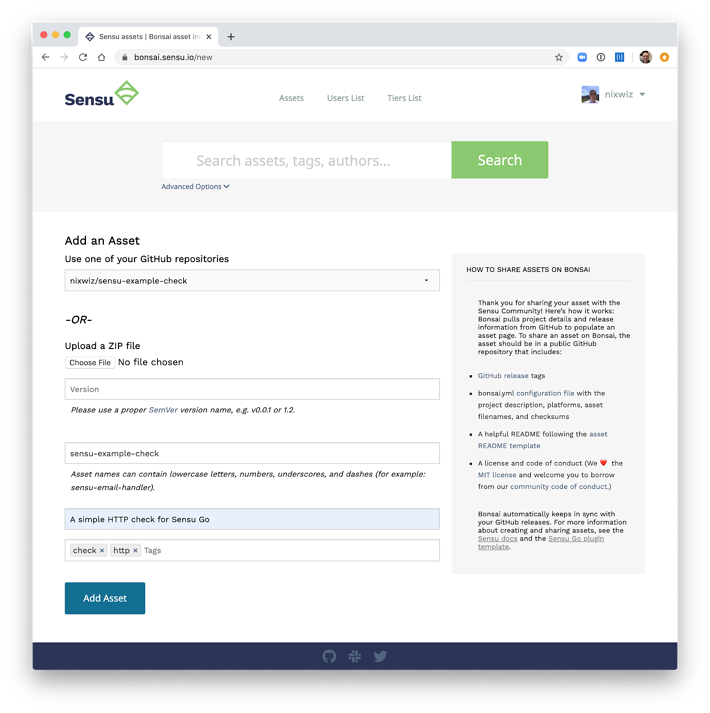
Since we already have the Bonsai yaml file in our template, we’re essentially already set up and ready to go. To share the asset, I’ll load up my GitHub repos and choose sensu-example-check (our example in this case). We can tag it as a check and add the asset.
From there, Bonsai goes through and grabs all the release info and compiles the release assets — including the asset info you need for actually adding your environments in sensuctl. Reload the page, and you’ll see the Bonsai asset definition all filled out, as well as release notes. From there, you can go to your environment and add the check:
sensuctl asset add nixwiz/sensu-example-check
There you have it! In the space of ~22 minutes (if you were following along in real time in the demo), we have a brand-new check written in golang up on Bonsai.
Bonus demo: Creating an AWS handler
Next up, I’ll show how to create a Sensu handler from the handler template.
A quick note on how handlers differ from checks: a handler consumes the Sensu event that’s been produced by a check. It may be a bit more complicated at first, but it’s also more expressive. Handlers give you access to things like annotations from your entity or check, enabling you to do interesting logic when building your own handlers.
We’ll create a handler that sends alerts to AWS SNS. For this example, I essentially took 8 lines of source code from the AWS example page for sending a message in golang to SNS and I combined that with the handler template to produce this code that we will discuss below.
Let’s take a look at the code in main.go. For the arguments, we provide a topic ARN and a message template, for which we provide a default value. There’s an input validation that we’re providing a topic ARN. In the execution of the handler, we resolve the message template using the event. The evalTemplate function goes and pulls these templated values out of the event so you can use these to surface critical information. If you wanted to add check occurrences or check output in your message, you could do that by specifying those event attributes in the message template. The rest of the handler is simply those few lines of code from the AWS example. Now that I have this message string from the template, I can send it to SNS.
One thing to note from the config section of the handler is the ‘Keyspace’ definition. The keyspace is what allows you to customize handler arguments on a per-entity or per-check basis. For example, if you create a check that has an annotation with this keyspace specifying the argument for the topic ARN (topic-arn) you can then override the topic ARN specified in the definition of the handler. You could also do this for the message template and send different output for certain checks or entities. Below is an example of doing this for a check (truncated for brevity):

The SDK does this powerful thinking for you, pulling in the annotations on your behalf and allowing those to override command-line options specified in your check. The SDK is also what enables you to customize arguments on a per-entity basis by adding the same kind of annotations to the entity.
Said another way, annotations let you build your own business logic. You put that logic into the check or entity to ensure you’re driving information to the right service (AKA, throwing the alerts you want).
Dealing with binary assets and shared libraries
Some (non-golang) compiled plugins may require shared libraries not included in a standard OS install or container. The most common scenarios would be a plugin for a third-party binary product — a database like PostgreSQL, for example. In these cases, you’d want to include those shared library files in the asset (unless you plan on installing the Postgres client on every possible agent that you’d run a check from, which we wouldn’t necessarily recommend). In the following demo, I’ll walk you through it.
Demo: Cracking open an asset that uses third-party libraries
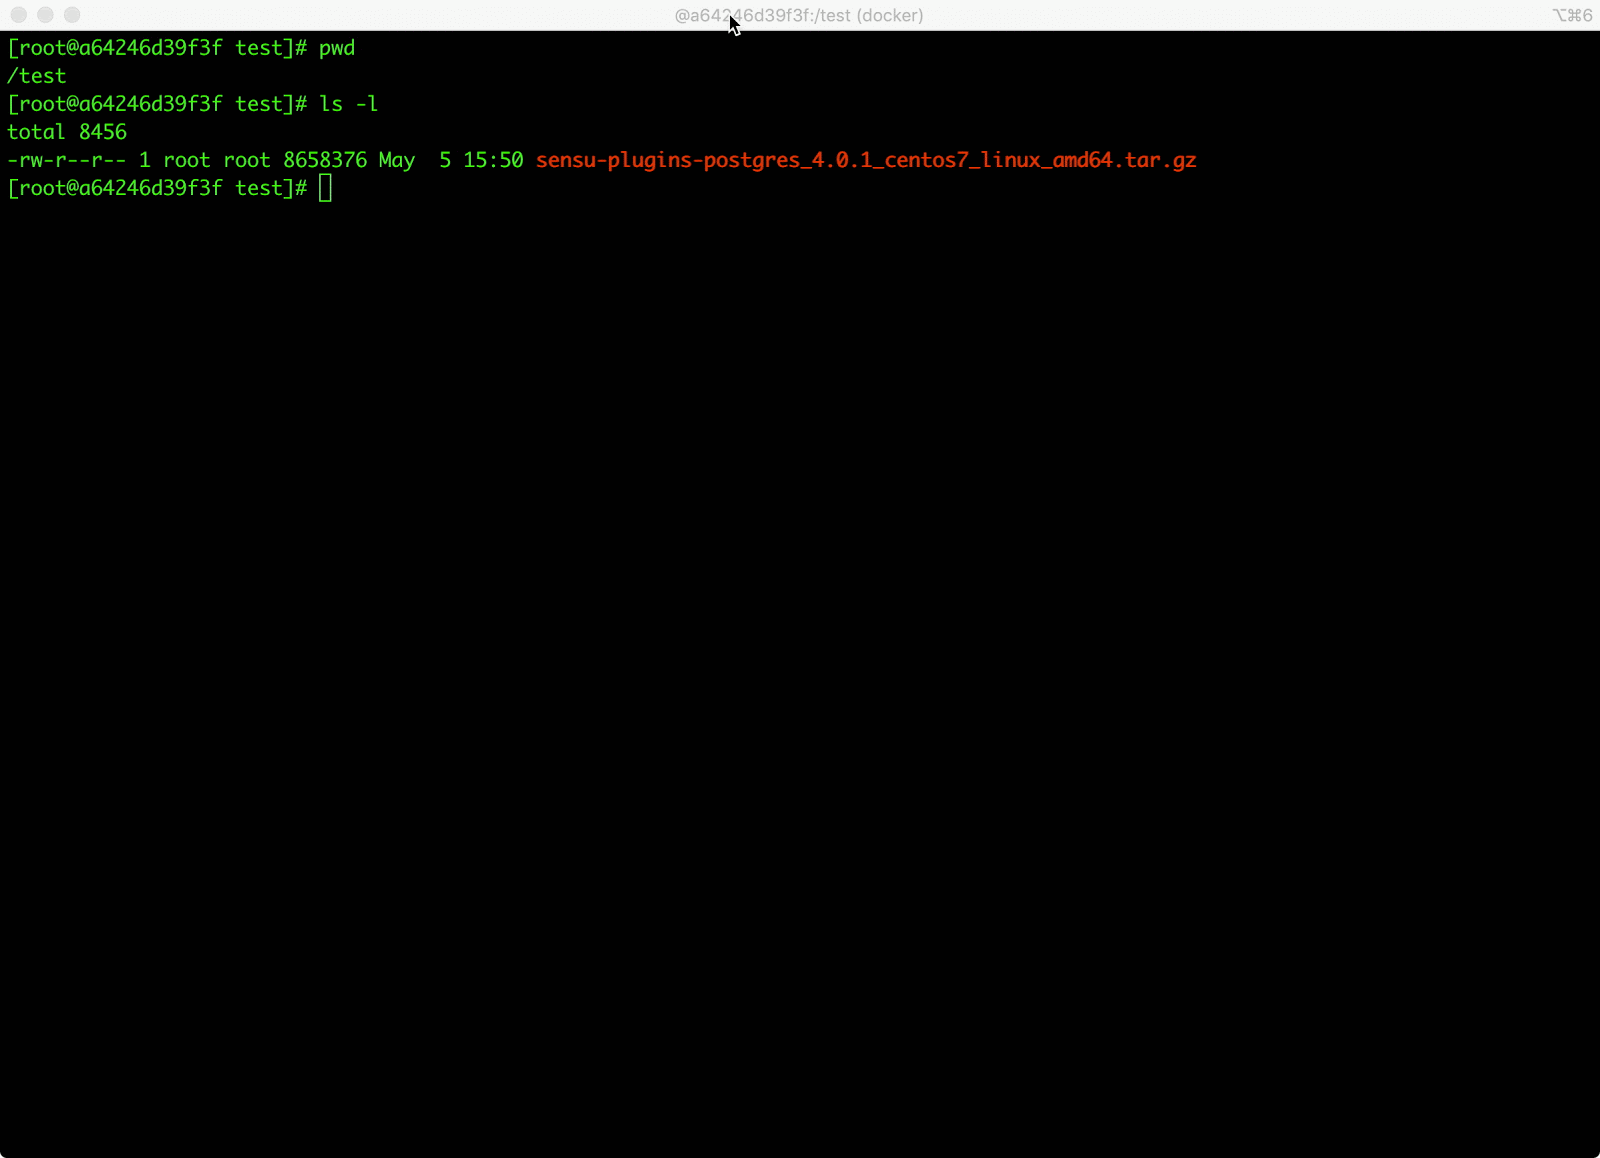
In this demo, I’ll go to Bonsai, find the Postgres asset, and get the download URL for the CentOS7 asset tar file. I will use a CentOS 7 Docker container to download and examine this asset.
Assets contain a bin and a lib directory. The bin directory contains the checks, handlers, and the other commands that get added to the path during asset execution. The lib directory contains any shared libraries that may be needed by the binaries in the bin directory. If we take a look, we can see there’s quite a few in here already, but let’s take a look at one in particular:
lib/ruby/2.4.0/gems/pg-1.2.2/ext/pg_ext.so.
If I do an ldd on this, it tries to resolve the libpq.so.5 library and can’t find it. To solve for this, we’ll make sure the LD_LIBRARY_PATH is set to the lib directory of your assets. If I add the lib directory from this asset to LD_LIBRARY_PATH and do the ldd, that Postgres shared library now gets resolved properly.
When building assets with binaries in them, you’ll want to check for whether they use shared libraries that might not normally be available as part of your OS or container. TL;DR: If you’re building an asset that includes a shared library, make sure to include it in your asset.
As many of you may know, a lot of the classic Ruby plugins need native extensions that are C libraries; this is how we make it possible for you to build those in a shared manner and still be able to publish them publicly.
Over to you (plus, a webinar)
We hope these gave you an idea of what you can do with assets and the sensu-plugin-sdk! Give it a try — use the plugin tools to build your next plugin or refactor an existing plugin. Here are those resources again:
-
Bonsai, the Sensu asset index
There are lots of existing Ruby runtime plugins being brought over, and we’d love to get the community involved in converting some of them to start using golang and build them with the SDK. Thanks to your efforts, everyone in the community will benefit!
Check out our webinar to learn more about the newest features in Sensu. Jef and Caleb cover the HashiCorp Vault integration and sensuctl command plugins.
Related Posts
Looking back at one year of Sensu assets & announcing a new Sensu plugins SDK
Assets were one of the biggest additions in Sensu Go. Developer Advocate Jef Spaleta looks back at one year of assets, with an update on the roadmap for Sensu contributors.

Made with #monitoringlove by SensuTM in Canada 🇨🇦 and the USA 🇺🇸. © 2017-2021 – Privacy Statement – Terms & Conditions